2014/09/23

Rivets in aerospace industry

B737 horizontal stabilizer ribs
Rivets are one of the oldest types of fasteners in aviation industry.

The most important difference between rivets and screws/bolts is that rivets are such fasteners who's strength is increasing during installation. It can be explained with two reasons;
  1. The material of the rivet during the plastic cold working (forging, stamping) experiences such structural transformation after which the strength (shear- and ultimate tensile strength) characteristics are improved. 

  2. The diameter of the rivet and therefore its authoritative cross section of the main loading is increasing due to the upsetting.

Classification of rivets according to their usage:

  • Solid shank rivets
  • Hollow-end or semi-tubular rivets
  • Blind rivets
  • Rivet-like Special fasteners
The most commonly used type in aviation industry is the solid shank rivet. They are used to joint the load bearing elements of the airframe. On a modern passenger aircraft there can be about more than half a million pieces of rivets, from which 90% are of this kind.

The hollow-end/semi-tubular rivets, made from titanium alloys, are commonly used on composite structures, mainly on coal- and graphite fiber materials.

Blind rivets are used on such parts where the bilateral accessibility on the joining parts are not possible and therefore the traditional rivets can not be installed. Commonly used on the hermetic fuselage flush repairs, on the filler part.

The rivet-like fasteners can be classified further into three parts:
  • Hi-shear rivet, which is in fact a high-strength bolt.
  • CherryBUCK is a bi-metallic, one-piece fastener that combines a shear strength shank with a ductile titanium-alloy tail. It is the lightest weight shear pin, which has the characteristics of both a rivet and a bolt.
  • Spacer rivets are in fact nor rivets, since they only fill the gap between the joining elements.

For further information on these types, please read in the appropriate blogs.

Resources: Imre Koncz, Balázs Gáti - Repülőgép szerkezetek, 2012

2014/09/21

Classification of fasteners based on fastening methods

We can classify two types of fasteners based on their installation:


  1. Removable fasteners - Those fasteners, which can be removed without the permanent damage or failure of either the fastened parts, or of the fastener, we call removable ones.

    They may be further installed after special and appropriate inspections.
  2. Permanent fasteners - Those fasteners, which's either part is damages or fails during the dis-assembly, we call permanent ones.

    Some of the parts of the specific types (which have more parts) may be reused if they were not damaged during the dis-assembly.

2014/09/12

Boeing 767-200/-300 Main Landing Gear

Understanding the operation of the B767's landing gear will first not be so easy. I'm presenting some of it's main, most important parts on the following pictures, to get familiar with their names and functions. (We are talking only about the main landing gear, the nose gear will be in an upcoming post.)

Opearation:
Turning down the LG Control lever, it opens the Main Gear Selector Valve, letting the pressurized fluid flow from the Center Hydraulic System to the LG system. The Gear Operated Sequence Valve opens the Door Latch Actuator which is first released by the Lock Out Actuator. Then it activates the Main Gear Door Actuator. The Main Gear Retract Actuator extends and turns the Trunnion which lowers the Shock Strut. The Truck Positioner Actuator tilts the gear for entry into the wheel well and operate proximity switches for the air/ground sensing systems. It makes a tilt of 17.6°. The Lock Actuators are moving the Side & Drag Lock Links into their fixed position. The Down Lock Springs assure the fixed, extended position of the LG which is ready for landing. The retraction is in the opposite order. There are some other covering panels/doors but they have no actuation.

The following pictures will illustrate these and other parts. (The Door mechanism is not illustrated on the pictures.)

SIDE BRACE INSTALLATION


DRAG BRACE INSTALLATION


Note, the Torsion Link was disassembled therefore it's hanging on a rope. Also, on the next picture the Truck Positioner is not on it's normal place, you may see it assembled on the first photo.

LEFT MAIN GEAR LOOKING OUTBOUND
The Down Lock Pin is used only on the ground, for securing the LG from retraction or from any other movement.
All in all you may have about 7-8 actuators which are necessary to extend/retract the LG. Namely;
  • Truck Positioner Actuator
  • Side Brace Actuator
  • Drag Brace Actuator
  • Retract Actuator
For the Door mechanism:
  • Lockout Actuator
  • Latch Actuator
  • Door Actuator

Resources: Boeing 767 Training Manual - 1992

2014/09/08

Bathroom sink re-installation

In this blog, I'm sharing my experiences on how to re-install (or install) a bathroom sink in your home. (Note, any other configuration can exist but the steps are similar and the advises might be useful.) My sink happen to broke after it has been there for about 15 years. This is a normal age for any sanitary to break down. No wonder why the guaranty for such products are usually 10 years. 

At the very beginning, close the incoming water, preferably with the valve under the sink and unscrew the pipes at their base. When you are done with it you can start to remove the drain pipes. The trap will contain a bit of water because of its curved shape, since it is designed to close totally the duct in order not to stink. After you've removed it will stink of course. Now it's time to loosen the two nuts which are fixing the sink to the wall.

When you've removed the sink, place it on a table-kind-of-think, so that the tap is hanging down and the sink is lying on it's top surface. This is the simplest way to unscrew the corroded fasteners of the tap. You remove the pipes and the pop-up lever, and the tap is off. This is time for observation and deciding whether the tap needs to be replaced or not. Even if it's working fine, think also about the next 2-5 years, because the last think you want to do is to replace the tap in the next years but this time the sink is on, and it's harder to replace from under. It's also the question of budget, so think twice.

In my case, I had to replace because the rust find its place on the screws and it was impossible to take it out. It broke off as you see on the picture. Also it was risky to use it later because I already replaced the filter in it twice and the lever was also malfunctioning sometimes. Back to the store, and let's buy the tap. WARNING! (You need to be careful what you chose from the shelf.) There is a difference between taps; there are ones designed for low and high pressures but they all look the same. What it means (you probably know if you're on my website) is the low-pressure one is used as a direct connection to a boiler. When you have a small house and you only have a boiler above the sink (~10 liter size) then you need this type. I need definitely the high-pressure one because the water is going to the 1st floor...So be careful and check the little flash-light icon on the box (that indicates low-pressure).

I bought this new masterpiece for 11000HUF which is about 55$. Yes, don't be surprised if you find such a precise manufacturing in the box. (By the way, check the sink before buying it for all cracks in and outside if you want to prevent changing it again in a few years.) The tap comes with pop-up, flange, gasket and a jamb nut. (make sure that it really includes these) Why they include them? Because once you have a new tap, you have a different mechanism for the pop-up lock and it's lever and the pivot rod will be designed to fit in the gasket. It's usually standard size so you can keep the original and only replace the new lever to look brand new. I had the same intentions, but I had to change the pop-up so I decided to use the new - PLASTIC one.? Why plastic? Probably because of the cheap price, but I realized that they save everything these days. What was copper 20 years ago is now a cheap plastic. And if I have plastic gasket-nut, I need to have the drain parts to be made of plastic as well because you shouldn't connect plastic with metal. So back to the store, and let's replace the copper drain for a new plastic one. (I could find copper also, but then it would be 3x the price of a plastic and I had money only for the sink, not to mention the tap...) Luckily they sell it in a set, so the tailpiece, coupling nut, trap and a pipe is at hand. 

When you have everything bought, time for the installation. 
The steps are a bit different. First and most important thing is to cut out the place of the tap on the sink. They sell it uncut because they want to see your ability...haha no, 'cos you might have the tap coming from the wall and not through the sink. Also, it's giving you options where to place the tap (middle, left or right side). How to cut? Don't even start hitting it from the back/lower side because it'll make noticeable damage on the top surface that you can't hide. Decide where the tap is going to be - middle probably. Measure the position of the center of the pre-made circle. Measure if twice, and mark it. Draw also a smaller circle. Use a hammer and a small, flat screwdriver to cut it out. I recommend it because it'll not bend like a nail. Even if the nail is strong enough it'll become obtuse, so use a FLAT screwdriver's edge - a high-steel for this reason. Start to hit slowly with medium strength. Still on the TOP surface! It'll take time but once it'll brake in, your blood pressure will drop. Now with the same tools, start making the circle bigger and bigger like a sculptor. It'll be fun to see how it's actually getting nicer and circle-like. Don't cut too much, only the size of the pre-made circle (the tap has to cover the hole totally). 
Done, put the sink on the table with face down, screw in the pipes to the tap, the screws and the lever for the pop-up, and see if it fits. Check if the pipes are not pushed to the china's surface because it might make damage to it (they are very sensible of twisting so be careful). If it does, cut a bit more. (for a future guarantee, buy high quality pipes for the tap, don't use the ones they include)
Install the tap the same way, don't forget the C profile and the rubber seal under the screws. Make sure that the screw's are totally screwed in and their visible end has the cutting in, allowing you to screw in with a tool.
Now put the gasket and the flange from two sides, and connect by screwing them together (don't forget the white seal ring). Place the pivot rod with a plastic ball on it inside the gasket and fix it there. Connect it with the lever coming down from the tap. This might be a 'fun' game to properly connect the whole mechanism. Push in the pop-up several times, play with the lever to see if everything is working smoothly. Put back the sink to the existing fasteners. I advise to use some rubber piece into the holes on the sink, so that the bolt coming from the wall will not contact directly to the china. Put on the washer and the nut and fasten them. Once it's on, connect the pipes to the valves and open it (remember to push in the pop-up). See if there is any leakage anywhere, if so use Teflon tape on the pipe or screw the gasket more to the flange. If not, be happy and connect the drain pipes as it should be.

Finally make several tests. Check the pop-up functioning, you can still adjust it from under. Search for leakage through the drain parts.
Most important place to look for is the connection of the stub with the wall. There is a rubber seal inside the wall and in my case it didn't close well with the new plastic tube. 


I hope I could help, have a nice installation.

2014/04/20

Detached curvilinear shock wave

I would like to first introduce the concept of homoenergetic flow (stationary). In such flows, we have.
Similarly, the flow is homoentropic if. Thus when the flow is homoentropic then the entropy is uniformly distributed in the flow domain. (see in yellow on the figure)

If the flow is homoenergetic and homoentropic, it is automatically barotropic and the Bernoulli constant CB in global. (In 2D flows, it implies that the velocity field is potential, since , they are perpendicular to each other, therefore.

Now, having all these, we can write the Crocco equation:
According to the Crocco equation, any inhomogeneity in the spatial distribution of entropy in the homoenergetic flow immediately leads to vorticity generation.

In the figure you may see the detached shock wave generated at the wedge. The flow in the neighborhood of a nose tip is subsonic (M<1) and then after the intersection of the dashed lines it become supersonic (M>1). 

The value of θmax is an increasing function of Mach number M1. Hence, at the flow around a concave fixed angle θ or the wedge with a fixed apex angle , a detached shock wave with increasing free-stream Mach number at critical M1* will arise. (Detached shock wave arising in a supersonic gas flow.) Further increasing M1, the distance between the detached shock wave and the body as well as the subsonic flow region will increase.

In the region where the shock wave is strong, the constant entropy curves have a larger value than further distance from the apex of the wedge, where the shock is weak. (this assumption is given on the figure)


Reference: Foundations of Fluid Mechanics with Applications - Sergey P. Kiselev, Evgenii Vorozhtsov, Vasily M. Fomin

Peter Deak

2014/04/06

Elastohydrodynamic lubrication

As we all know, bearings can roll, slide or do both simultaneously, therefore lubrication is essential in any bearing to reduce friction (thus wear) and remove heat.

maxxtorque.com
Elastohydrodynamic, is one of the types of the Full-Film Lubrication. In this type, the contacting surfaces are nonconforming (the gear teeth, cam and follower), then it is more difficult to form a full-film of lubricant, since the nonconforming surfaces tend to expel rather than entrap the fluid. 
  • At low speed these joints will be in boundary lubrication, and high wear rates can result with possible scuffing and scoring. 
  • The load creates a contact patch from the elastic deflections of the surfaces.
  • This small contact patch can provide enough of a flat surface to allow a full hydrodynamic film to form if the relative sliding velocity is high enough.

This is all I wanted to tell about such a kind of lubrication. The name itself is really scary-sounding, but not that strange if you know what it means. 


Reference: Machine Design An Integrated Approach, 4th edition - Robert L. Norton

Peter Deak

2014/03/21

Question - Law of Archimedes

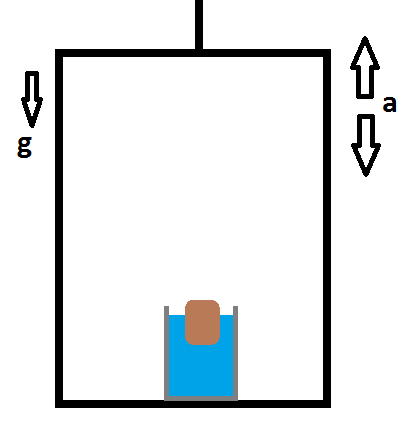
Imagine you have an elevator and we place a bucket filled with water in it. On the surface of the water there is a floating cork, which is in some portion inside the water. What would happen to the cork if the elevator moves up or down? Would it submerge more when moving up, or less when moving down? Or nothing will happen to it's position?
To answer the question we need to consider the Law of Archimedes. If we calculate the total hydrostatic force acting on an immersed body, which is in fact the surface force, we will see that it equals to -G, so it is directed against the gravity force. As a result, its value is equal to the weight of the displaced liquid.
Once the lift generates an increase/decrease in the water's weight, by the acceleration, the displacement force will also be increased/decreased by the same amount. Therefore our body (cork) will stay at the same level in the water.

Archimedes' principle also states that when a body is immersed in a fluid it experiences an upthrust, or apparent loss of weight, equal to the weight of the fluid displaced by the body. Fluid pressure is increasing with depth, which means that there is a greater pressure pushing up on the body from underneath than there is pushing down on it from on top.


Peter Deak


Reference: A.C.Kermode, Mechanics of Flight, 10th edition, pp.25.

2014/03/02

Why do birds fly in V shape?

I was wandering about the birds which were flying over my head recently, why do they actually fly like this? I started to think it over and I amazed myself that the answer is just that obvious. To reduce drag!

redorbit.com
Okay, don't get there too fast, so let's consider the air first. It's invisible, therefore making our life's harder. In the case of a ship, when it passes through water we can see the bow wave, wash astern and all the turbulence it creates. When an aeroplane makes its way through air we don't see any difference in the formation of air but we know about the drag. In fact, drag is a defined resistance produces to its motion. Drag determines the efficiency of flight therefore all aircraft are well designed to achieve the least possible resistance with air.  Before moving to birds, there is still another concept I would like to explain. Wakes, which in the case of airplanes are very similar to the wakes made by boats or ships. It's a displacement, as the vehicle passes through this fluid, in one case it's water, in one case it's air. The wingtips are creating wake vortices. It's a very large cone, coming back of the tip of the airplane. If there is a trailing plane which  intersects that cone, you'll feel choppiness.

https://spie.org/x14493.xml
Birds are all smart. They probably have felt the same effect if they fly behind another bird, therefore they are avoiding it. In fact, they are even smarter that they form a V shape, fly in the upwash of the wingtip vortices of the leading bird. The upwash helps them to support their weight, so achieving a reduction in the induced drag. The one flying on the front have the largest possible drag from all, but they all change places in time to have equally distributed flight fatigue among the other birds.

In military aviation it is a very common practice to fly in a V shape, also due to the same reason. In such flights they are doing a so called 'vortex surfing' to reduce drag.
An 26 (photo: István Horváth)
References:


  • http://en.wikipedia.org/wiki/V_formation
  • A. C. Kermode - Mechanics of Flight


Peter Deak

2014/02/19

The Start

In real life engineering there are very unstructured design problems and they must be structured by you before they can be solved. Usually, there is no "back of the book" to refer to for the answer. It usually makes students and engineers a bit nervous. They usually face the "blank paper syndrome", not knowing where to begin. Just like here, I must create my own site, write my posts which was easy for the first thought. 

Fortunately, there is a good prescription for this issue.
  1. You must begin somewhere.
  2. Wherever you begin, it will probably not be the best place to do so.
  3. The magic of iteration will allow you to back up, improve your design and eventually succeed.
With all my respect to all those engineers who are successfully reached their dream, I am launching this blog now, and hopefully I will benefit a lot from these writings. I recommend these writings for all of you who found my blog and find something in their interest. I would like to seek for others with whom I can share my thoughts and who are willing to help me.

Let's start this blog with the first step of the "design problem".

Reference: Machine Design An Integrated Approach, 4th edition - Robert L. Norton

Peter Deak